Understanding Audio Signals: A Beginner's Guide
Understanding Audio Signals: A Beginner's Guide

Analog vs. Digital Audio
Analog Audio: The Basics
Analog audio signals are continuous waveforms that directly represent sound waves. These signals vary smoothly over time and are typically captured using microphones and recorded on devices like tape recorders or vinyl records. The main characteristic of analog signals is their ability to capture the natural sound without requiring conversion to a digital format.
Digital Audio: The Transformation
Digital audio signals, on the other hand, are discrete numerical representations of sound. These signals are created by sampling analog audio at regular intervals and converting these samples into binary data. This process involves two key parameters: sampling rate and bit depth. Digital audio is commonly used in modern audio production because it allows for precise editing, manipulation, and storage.
Key Differences
The primary difference between analog and digital audio is in the way they represent sound. Analog audio is a direct representation, while digital audio requires conversion and is represented as a series of numbers. This conversion allows for more flexibility in processing and storage but can also introduce artifacts if not done correctly.
Signal Path and Flow
Understanding Signal Path
The signal path in audio engineering refers to the route taken by an audio signal from its source to its destination. This path includes various stages of processing and can involve multiple pieces of equipment, such as microphones, preamps, compressors, equalizers, and audio interfaces.
Typical Signal Flow in a Home Studio
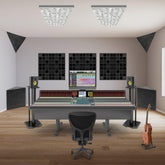
In a home studio, a typical signal flow might start with a microphone capturing sound, which is then sent to a preamp to boost the signal. The signal might then pass through an equalizer and compressor before being converted to digital form by an audio interface and recorded into a Digital Audio Workstation (DAW).
Importance of a Clean Signal Path
Maintaining a clean and efficient signal path is crucial for high-quality audio recordings. Each piece of equipment in the signal path can introduce noise and distortion, so it’s important to ensure all connections are secure and equipment is properly maintained.
Sampling Rates and Bit Depth
What is Sampling Rate?
The sampling rate defines how often an analog signal is sampled per second to convert it into a digital signal. It is measured in Hertz (Hz). Common sampling rates include 44.1 kHz (standard for CDs), 48 kHz (used in video production), and higher rates like 96 kHz and 192 kHz for high-resolution audio.
Understanding Bit Depth
Bit depth refers to the number of bits used to represent each sampled value. It determines the dynamic range of the audio signal, which is the difference between the quietest and loudest parts of the audio. Common bit depths are 16-bit (standard for CDs) and 24-bit (used in professional audio).
Impact on Audio Quality
Higher sampling rates and bit depths result in better audio quality, providing more detail and a greater dynamic range. However, they also require more storage space and processing power. Finding the right balance is key, depending on the specific needs of the project.
Signal Processing and Effects
Equalization (EQ)
Equalization involves adjusting the balance of different frequency components in an audio signal. It can enhance certain frequencies while reducing others, helping to shape the sound to achieve the desired tone.
Compression
Compression reduces the dynamic range of an audio signal, making quiet sounds louder and loud sounds quieter. This helps in achieving a more consistent volume level throughout the recording.
Reverb and Delay
Reverb adds a sense of space and depth to a recording by simulating the reflections of sound in an environment. Delay creates an echo effect by repeating the audio signal after a set period.

Monitoring and Adjusting Signals
Using Studio Monitors
Studio monitors are speakers designed for accurate audio reproduction. They allow engineers to hear the true sound of the recording without coloration, making it easier to make precise adjustments.
Headphone Monitoring
High-quality headphones are essential for detailed listening, especially when working in environments where loud monitoring is not possible. They help in identifying issues like noise, distortion, and balance problems.
Metering and Analysis
Using visual tools like peak meters and spectrograms helps engineers monitor the levels and frequency content of the audio signal. These tools provide a visual representation of the audio, aiding in making informed decisions during mixing and mastering.
Practical Tips for Managing Audio Signals
Proper Gain Staging
Gain staging involves setting the appropriate levels at each stage of the signal path to ensure a clean and noise-free signal. Proper gain staging prevents distortion and maintains audio quality.
Cable Management
Organizing and managing cables can reduce the risk of interference and signal degradation. Use high-quality cables and connectors, and keep them neatly arranged to avoid tangling and damage.
Regular Maintenance
Regularly maintaining and calibrating your equipment ensures optimal performance. Clean connectors, check for wear and tear, and update software to keep your studio running smoothly.
Conclusion
Understanding audio signals is fundamental to mastering sound engineering. By grasping the differences between analog and digital audio, managing signal paths, and using proper signal processing techniques, you can produce high-quality recordings. Whether you're setting up a home studio or aiming to work in professional audio environments, these basics will provide a strong foundation. Remember, continuous learning and practice are key to becoming proficient in sound engineering.
ABOUT AUTHOR
House Live Engineer of Free Bird, a live house with the history of South Korea's indie music scene.
Single album/Regular album/Live recording, Mixing and Mastering experience of various rock and jazz musicians


